Realtime chess with web-sockets
Chess always fascinates me, while playing online chess I really had a great interest in knowing how things work and now that I have a decent knowledge of web development it seems simple to implement it.
So, let’s gear up and make a small and easy real-time chess game.
For moving ahead we would require Node.js and a code editor of your choice. That’s it and we are all set to proceed.
Let’s get started
- Open command-line and make a new folder and head over to that folder.
mkdir realtime_chesscd realtime_chess
Now initialize your project with npm
npm initThis will prompt you with a series of steps to add the necessary details.
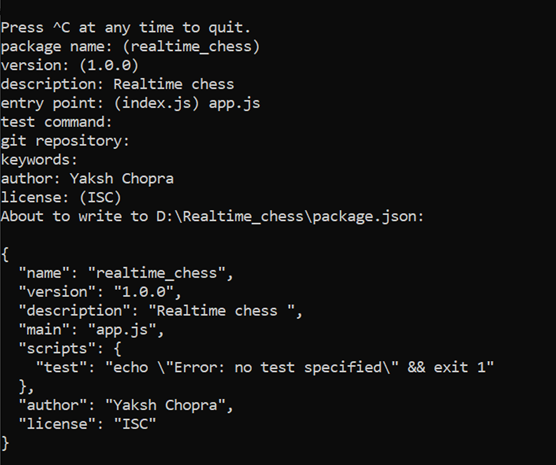
Here I have selected the endpoint as app.js. You can set it as any name of your wish.
Now install express.
npm install express — saveThe — save parameter will automatically add the dependency in your package.json file.
The project setup is complete so let’s dive right into the code.
2. We will start by making a simple server
create a file app.js (or whichever endpoint you have chosen for your web app) and add the following code in app.js.
var express = require('express');var app = express();app.use(express.static('public'));var http = require('http').Server(app);var port = process.env.PORT || 5000;app.get('/', function(req, res) {res.sendFile(__dirname + '/public/index.html');});
http.listen(port, function() {console.log('listening on : ' + port);});
Here we have created a simple web server with the help of express and HTTP modules.
We use the HTTP module as we know that javaScript cannot directly access the networking capability of a server(here your device), this can be done using c++. As we all know that Node.js is built on top of chrome’s v8 engine and c++. Node.js does the network connection for us and we just need to import the HTTP module to set things up in javaScript.
3. Now create a folder in your root directory. I will be using the name public for the folder.
In the public directory create index.html.
4. Now we are ready to set up our chessboard. We will be using the following two libraries for setting up the chessboard:
Chessboard.js: Which is a powerful touch-ready JavaScript library that will help us get our chessboard on the UI.
Chess.js: This is an amazing JavaScript library that keeps a check on the chess logic i.e it allows us to only makes legal moves.
Head over to these libraries download the latest version and extract the contents in the public folder. Otherwise, click here and copy the contents from the res folder of the repository into your public folder.
Now let’s add a markup to our index.html.
<!doctype html><html><head><title>Realtime-Chess</title><link rel="stylesheet" href="lib/chessboard-0.3.0.min.css"></head><body><div id='gameBoard'></div><script src="lib/chess.min.js"></script><script src="lib/chessboard-0.3.0.min.js"></script><script src="lib/jquery-1.11.1.js"></script><script src="/client.js"></script></body></html>
Here we have added the basic markup and linked our libraries with our app.
5. Now we will create a client.js in our public folder and add the underlying code to it
var board;var game;window.onload = function () {initGame();};var initGame = function() {var cfg = {draggable: true,position: 'start',onDrop: handleMove,};board = new ChessBoard('gameBoard', cfg);game = new Chess();};var handleMove = function(source, target ) {var move = game.move({from: source, to: target});if (move === null) return 'snapback';};
The above code will enable us to make moves by dragging the pieces on the board and will return the pieces to their original positions in case of an illegal move. To get more insights on how things are working here check out the documentation of chessboard.js
6. Now let us add some basic styling to our chessboard in index.html.
<style>body {overflow-y: auto;display: flex;align-items: center;justify-content: center;}#gameBoard { width: 60%;}<style>
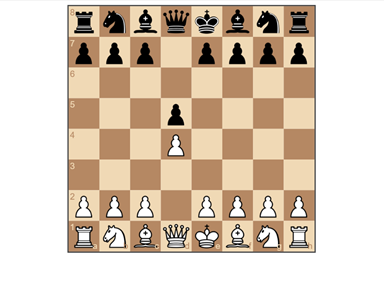
Now run your server with the command given below
node app.jsNow head over to localhost:5000 to see your pieces in action.
This is just a simple chess board but we need to make it real-time.
For making our web app real-time we need to communicate between the server and client. For this, we will use socket.io.
Socket.io is a JavaScript framework that helps to make stuff real-time using web sockets.
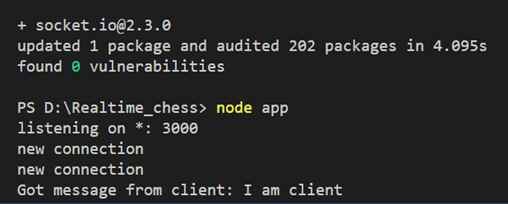
Now head over to the terminal install socket.io
npm install socket.io –saveAdd the given script tag in the head section of index.html.
<script src="/socket.io/socket.io.js"></script>7. Let’s get ready to play with WebSockets.
Add the following command in client.js
var socket = io();window.onclick = function(e) {socket.emit('message', 'I am server');};
With this, We set up our client.
8. Add the following code snippet in app.js.
var io = require('socket.io')(http);io.on('connection', function(socket) {console.log('new connection');socket.on('message', function(msg) {console.log('Message from client: ' + msg); });});
With this, we set up our server.
When we run our server we can see the message from the client on the terminal.
8. Now it’s time to connect our game to socket.io.
Add the following code in client.js
var handleMove = function(source, target) {var move = game.move({from: source, to: target});if (move === null) return 'snapback';else socket.emit('move', move);};
With the help of the socket.emit() function we are sending moves made by the client to our chessboard.
9. Now replace the simple message handler code in app.js with the following code snippet:
io.on('connection', function(socket) {console.log('new connection');
socket.on('move', function(msg) {socket.broadcast.emit('move', msg);});});
Here we are reading the move from the client and sending our moves to the board. The socket.on() function is called when the client calls socket.emit() function.
10. Now the client needs to receive the move from the chessboard made by the server.
Add the following code in client.js.
socket.on('move', function (msg) {game.move(msg);board.position(game.fen());});
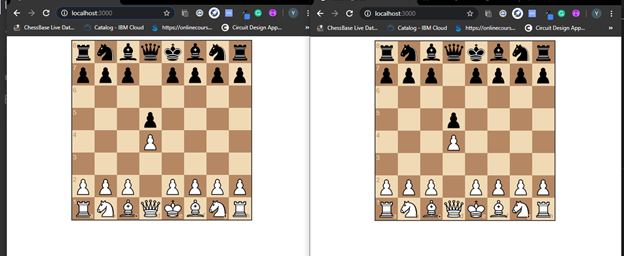
Now run your server open it in two different tabs and see the real-time interaction between the client and the server.
After each move, we are sending the position of the board using the fen notation. To get some more insights on fen notation check this link.
In no time we have created a real-time chess web app.
To get the complete code check the GitHub repository